Saturday, November 12, 2016

Thanksgiving Dinner Chart - Bar Graph Fun!

I am always looking for ways to incorporate math into ANY!!  Math is the LEAST favorite subject in my house, how about yours?  

I created the Thanksgiving Dinner Chart to practise bar graph skills.  It also creates opportunities for each kiddo to engage will friends and family, near or far, in this "research project".   

It is simple, just ask each person what their favorite part of Thanksgiving dinner is.    As your child collects the "data", they can start filling in the chart. 


You can get this Thanksgiving Dinner Chart at my TpT store.  Check out  My Thanksgiving Day booklet , all about the 5 senses- B/W or Color,  while you are there. 

Sunday, October 23, 2016

Printable Halloween Themed Math Game - Addition & Subtraction

Looking for something to help make Math a bit more fun??  I may have just what you need!


Halloween Math Game - Addition & Subtraction

Help Batty get to the Halloween Party.

2 die, 1 penny, token(s)
Roll the die and flip the coin.
Heads=add the two die
Tails=subtract the two die
IF you get it right, move the LARGER die number forward.
IF you get it wrong, lose your turn.  

Lots of fun.....lots of addition and subtraction learning!!!

WIN-WIN!!


You can find this math game at my TpT store!   Check out my other math games: Money Race and Gingerbread Man

Monday, September 26, 2016

Fall Themed ABC Order Worsheets

Fall is my favorite season.   We live in Upstate New York and are blessed to see the leaves change, pick apples at the many orchards, go to one of many pumpkin patches in the area.   
With fall all around me, I was inspired to do some more ABC order worksheets with a fall theme.  
You can find all these at my TpT store.
OR
For a limited time, if you go to my Facebook page and message me which one you want, you can have ONE of these fun ABC Order worksheets for FREE!!!!!   

You can get ALL 5 pages in one download here!


Thursday, March 10, 2016

DIY Scrapbook Paper Spring Flowers - 2 Crafts in 1


Seeing more and more grass on our snow covered lawn always gives me hope that Spring is just around the corner.  It also gets my "green thumb" excited, too.  
I did this cute little craft to help hold off my "green thumb" until it is time with the help of my kiddos!  Great thing is that THESE flowers will never die! 

We did 2 different crafts:

refrigerator magnet
potted flower

What you need:


-Make some templates ahead of time (card stock works best)  - 2 different styles of flowers in 3 different sizes.
-glue
-scissors
magnetic strips for refrigerator magnet
small flower pot (got mine at Wal-Mart for $.38 each!)
scrapbook paper - 3 different designs for the flower - green design or plain for the stem and another green for the leaves
jumbo popscicle sticks
dirt or sand (not shown)

Let's Begin!

Step 1: Using your templates, cut out the three flower pieces using your 3 different scrapbook paper. Make sure you mix match them!


Make sure you are tracing around your template on the white side of your paper...


NOT this side.  It is super hard to find the lines!  


Don't forget to cut out your "stem", "leaves", and middle circle!

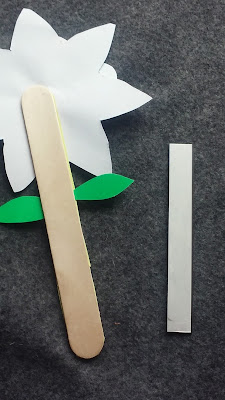
Step 2: Make your stem and leaves - Put your leaves on the popscicle stick first.  Then put the paper for the stem down.


Step 3: Put the flower together.  


Look at all those different colors and designs...yet goes together beautifully. 

Step 4: Put your flower on the stem.


All done! 

Now let's make one into a refrigerator magnet.  All you need to do is add on the adhesive magnetic strip to the back of the stem.


Who wouldn't want this beautiful flower on their refrigerator? 


Or you can make it into a potted flower! Just add some dirt or sand into your pot and put the flower in.  Looks so pretty! 


 This craft will let Spring in your home ANY time of year!


Monday, February 22, 2016

St. Patrick's Day Ideas

Looking for some fun ideas for St. Patrick's Day? 

I may have some great ideas for you!

Always love sweet treats!  These Irish Dirt Cakes look fabulous from Outnumbered 3 to 1


Looking for a fun craft to do with your kiddos?   Raising Whasians have 50 for you to choose from. 


St. Patrick's Day Science Fun!!!  


St. Patrick's Day Lapbook
Learn about the origins of this holiday with
"St. Patrick's Day" Project Pack"


Sunday, February 21, 2016

"All About George" - Unit Study of George Washington


As President's Day was approaching, I had my girl make some clip art for me so I could do some worksheets that included George Washington and Abraham Lincoln.    With the clip art done, I was ready to begin....but a few things happened:

#1 -had some medical issues that kept me pretty much exhausted daily for almost 2 weeks
#2 - When I started deciding what to do  and researching, a great idea formulated that turned making a couple worksheets into making a 13 page unit study!

While researching I decided that it would be a great idea to have the kiddos research, too.  I am made this unit study to use  with my 3rd grader and 10th grader.  My 3rd grader may need a little more time with a few things, but there is plenty for my 10th grader to do and stay occupied.  I will make the writing projects longer for him.  

There are 5 sections to my unit study:
Early Years
Survey Like George
Before the Revolutionary War
The Revolutionary War
The Presidency

Each section gives you a URL site to research.  There are directions on each page to guide them.  
This is a pretty straight forward unit study with a few sections where they need to use their own words and write a few paragraphs.  

For the rest of February, I am going to give away "All About George" for FREE. 
To get this fun and interactive unit study, head over to:


Message me there and I will send the PDF file to you!    It is that simple!  


Wednesday, February 10, 2016

10 FREE Valentines Printables


I did a little research to find some fun and FREE  Valentines for Valentine's Day! 


Lego Valentines from The Imperfect Homemaker's site. 

picture from The Imperfect Homemaker


I Spy Game Valentines from Gift of Curiosity's site.

picture from Gift of Curiosity


Angry Birds, Blue's Clues, Pokemon & SpongeBob Valentines from DLTK's site. 

pictures from DLTK


Frozen Valentines from Disney Family's site.

pictures from Disney Family


Alice in Wonderland Valentines from Disney Family's site.

pictures from Disney Family


Jungle Book Valentines from Disney Family's site.

picture from Disney Family


How to Train Your Dragon from The Jenny Evolution's site.


Star Wars Valentines from The Jenny Evolution's site. 


Minecraft Valentines from A Grande Life's site.

picture from A Grande Life


59 GREAT "Regular" Valentines from PopSugar's site.
I think these are my favorites.  They are so unique and some are so clever.  I just love them! 

picture from PopSugar


Sunday, February 7, 2016

Church Time Worksheets


While I was working on some worksheets months ago, I decided to try my hand at making some Church Time Worksheets.  Something my boys could use to keep still and "get through" church.  My youngest asks me 30 times "where are we" on the "Order of Service" sheet from our bulletin.  My oldest stares off into space.....alot.  So, I thought if I could make something that keeps them busy AND engaged in church it would be a WIN-WIN situation for all of us.  


Tonight I decided to make two slightly different ones so that there will be four to choose from. 


You can get any of these worksheets for FREE at my Facebook page.  You will find them in the "Church Time Sheets" Album
  

Thursday, February 4, 2016

Minecraft Role Play Literature Classes from Skrafty


I was so excited to see that Skrafty has ROLE PLAY literature classes now.  If  just playing Minecraft FOR SCHOOL wasn't enough, now kiddos get to role play. 

picture from Skrafty

Here are the books they are using for class. 


This looks like great fun for any grade!!!   Make sure to check out all the different classes they offer for a very reasonable price.  You will be your kiddo's HERO! 

Saturday, January 30, 2016

Cooking With Kids - French Fry Chicken Bacon and Ranch Bake & Crescent Churros and Chocolate


This week at co-op we made French Fry Chicken Bacon & Ranch Bake and Crescent Churros and Chocolate .   I saw the French Fry Chicken Bacon & Ranch Bake come across my Facebook wall.  It looked delish and easy.  We made two different versions of it one with NO garlic and NO ranch and one WITH those ingredients.  

You can get the printable version of these recipes here

pictures from Pillsbury.com and Tasty on Facebook


What we used for the main course (remember this is for TWO entrees):
1 bag of  frozen chicken breasts from Aldi stores (thawed and cut into 1 inch cubes -give or take)
2 bags of SHOESTRING french fries
1 pound of cooked, crumbled bacon (cook in non-stick frying pan and keep some of the drippings to cook the chicken )
1 bottle of ranch dressing
8 oz. of shredded sharp cheese
8 oz. of shredded mozzarella cheese
2 tablespoons of minced garlic
 2 cast iron skillets
 cookie sheets
 non stick frying pans
olive oil
salt and pepper to taste

Step 1:  Pre-heat the oven for the french fries - 425degrees.  Put the 1 bag of frozen french fries  onto each cookie sheet and put in the oven for 20 minutes. (keep checking the fries, as one of our bags got done sooner than the other.  You don't want them burnt.)

Step 2: Set the stove for medium heat and in the non-stick frying pans, add in the garlic and half of the chicken cubes.  In the other frying pan, just add the other half of the chicken cubes.  Add your salt and pepper.  Cook thoroughly.

Step 3:  Take a paper towel and dab the olive oil on it and wipe the inside of the cast iron skillets.  Make sure to get the sides as well. 

Step 4: With the french fries done and the chicken done, it is time to put them in skillet.  FIRST set the oven for 350 degrees.  
- Put the french fries in the skillets first. You want to make sure the bottom is covered with the fries.  It may not take all the french fries and that is ok.
   - Now you want to add the chicken and make sure you spread the pieces around.
- You want to pour some ranch over the chicken and fries in one skillet. The amount really depends on how much YOU  like ranch.  Again, make sure it is evenly spread out over the chicken and fries. 
- Add your sharp cheese and mozzarella cheeses.  Sprinkle them evenly over the chicken and fries.  
- Add half of the bacon crumbles to each skillet.
The oven should be ready so put the skillets in the oven for 15 minutes.  When the cheese is all melted and bubbling, it is done! 


What we used for our dessert (enough for 15 people):

4 cans of crescent rolls 
2 cups of cinnamon sugar mix
1 stick of melted butter
1 bag of milk chocolate chips
knife or pizza cutter
pastry or bbq brush
2 cookie sheets 


Step 1:  MAKE SURE that the crescent rolls are C-O-L-D.  This is really important.  We had ours at room temperature and it was a M-E-S-S! When the dough is at room temperature it is super hard to do what needs to be done with it! 
When you take the roll of dough out...DO NO SEPARATE at the perforated edges!   You will want to manipulate the dough and make them disappear so that  you have one rectangle.  

Step 2: Cut the rectangle with a knife or pizza cutter, into 4  smaller rectangles.   

Step 3: Brush butter onto the rectangles and spread evenly.  NOT ALOT or it will make the dough soft and hard to work.   

Step 4: Sprinkle the sugar cinnamon mix on the rectangles.  

Step 5: Using a knife or pizza cutter, cut each rectangle into  equal strips.  Twist the strips and put on the cookie sheets.

Step 6: bake for 5 minutes and check.  You want them to be golden brown and not doughy. If they need more time, check them every 2 minutes until done.  

Step 7: Put the chocolate chips in a microwave safe bowl.  Heat at 30 second increments, stirring well until melted.

Step 7: While hot, brush more butter on each and sprinkle with the sugar cinnamon mix.

Whether you eat them warm or not, they are so scrumptious!  When you add a dollop of melted chocolate to your plate for dipping...well it just doesn't get better than that.  


Thursday, January 28, 2016

White Chocolate Chip Red Velvet Cookies


These cookies are not only soft and delish, they are so easy to make as well.  Perfect for Valentine's Day or any day!


I found that using cake mixes make the cookies so much softer!  I am not a fan of crisp, crunchy cookies.   When I discovered, by accident, how using the cake mixes changed that....we do almost ALL our cookies this way...and with great results. 

What you will need:


red velvet cake mix
1 1/2 cup of white chocolate chips
1/3 cup of oil
can of oil spray (not shown)
2 eggs
1 teaspoon of vanilla extract
parchment paper (a baker's best friend)
cookie sheets

Step #1: Heat oven to 350 degrees F

Step #2: Line your cookie sheets with the parchment paper and set aside


Step #3: In a large bowl put in- red velvet cake mix, eggs, vanilla and oil.  Now using electric beaters, mix together.  It will get a bit difficult, just try to get all of it off the beaters. 


Step #4: Add in the white chocolate chips and mix with a spoon.  If you don't feel there is enough chips, add more!


Step #5: Drop spoonfuls onto the parchment paper lined cookie sheet.


Step #6: Bake for 4 minutes and then turn the cookie sheet around.  Bake another 3 minutes.  They will be done with you touch them and they feel almost like a sponge.  


Step #7: Let them cool and enjoy!!!