Thursday, December 31, 2015

A Different Kind of Stuffed Mushroom

I have made MY version of stuffed mushrooms in the past for New Year's Eve.  I usually cheat and use stove top stuffing...BUT no one here likes stuffing but me and my girl.  
Soooo this year, I asked the guys what they would like as stuffing for the mushrooms:
1. steak
2. bacon
3. cheese
4. more cheese


I "compromised" with this:


They may not LOOK pretty, but I promise you they taste yummy!!

My stuffing:

diced mushrooms (from the stems)
diced onions
hamburger
hand shredded aged sharp cheddar cheese

I cleaned each mushroom and cut the stems off.  I then "scooped" out the stem inside the cap so there was room for the stuffing

I sprayed the bottom of a baking dish with canola and added them. 

I diced up the mushroom stems and onions.   I cooked them with the hamburger in a fry pan.  Drained out the oil.

Then I stuffed the mushrooms with the stuffing. Drizzled some butter on top of each and then put a nice heaping amount of shredded cheese on top of each one. 

Baked them uncovered in a 350 degree oven for about 15-20 minutes.  I even added more cheese on the ones that looked a bit "bare".   

I then put a paper towel on a plate and then placed the stuffed mushrooms.

DELICIOUS


 Some things I would have done differently:
1- added more salt and pepper
2 - cooked them a bit longer in the oven
3 - turned the oven to broiler

Saturday, December 26, 2015

Year In Review Printable Sheets


I am always looking for great ideas for a new family tradition.  
New Year's Eve is a great time to start one with these:

Year in Review Printables
you can get them at my Etsy store or my TpT store.

These would be great for your whole family - different color for each member.  You can then save them in a binder -for the whole family - or individual binders for each member.  Every New Year's Eve, fill out the new sheets and have fun reading the ones from the past year.


Tuesday, December 22, 2015

Holly & Jolly Elf - Science Experiment - Candy Cane Disposal


A new Science Experiment worksheet with the cutest elves ever: Holly & Jolly Elf!

digital art by Chi-Chee Banana's Art

This year, they have been put in charge of:
 Candy Cane Disposal

digital art by Chi-Chee Banana's Art

Holly & Jolly need help!  Using the Scientific Method, they will see what works in dissolving the Candy Canes and what won't.
The first 2 pages explain what they will be doing and all about the Scientific Method.  The last two pages are the charts they will need to do this experiment. 

You can get this 4-paged experiment at my TpT store or
at my Etsy store


Monday, December 21, 2015

Reindeer Bark - Adorable, EASY, & Delish!


This is my first attempt at making any kind of bark....and I loved it!!   It was so easy to make and a great treat for the kiddos to help make, too.

What you will need:


1 full bag of milk chocolate chips
pretzels
candy eyes
red sixlets or you can use red M&M type candies.
parchment paper
cookie sheet
crushed candy cane (optional - we did one batch with and one without)

*cut the pretzels in half.  I used a knife and kind of "sawed" was the best way to get clean breaks.   Every time I "pressed down" onto the pretzel to break it, it crumbled.  I did go through many to get the "antlers". *

Step #1:Melt ONE of the chocolates in a microwave.  Do this in
 30 second increments.  


Step #2: Pour the melted chocolate onto the middle of the 
parchment paper.  


Step #3: Start spreading the chocolate out into a rectangular shape, NOT to the edges of the parchment paper, though.  It took a bit for me with this and my OCD to try to make it smooth and even. 


Step #4: Place the eyes, nose and "antlers". (add the crushed candy cane after the reindeer are made if you are going to add them.)


Step #5: Let it set somewhere cool


Step #6: Using a knife to "map out" the sections you want by putting "grooves" into the bark.  Afterward, you should be able to gently apply pressure and the bark will break in the sections you created.


You can see one of my "grooves" where it did NOT break, but broke next to it. 

This was super fun to make!


Sunday, December 20, 2015

Grinch-y Storytime


This might be the last "Grinch-y" worksheet I make this year.  I have had a blast doing them, but want to work on a few new ones like Holly & Jolly Elf,  Pete the Penquin and Shelby drew me a most adorable Snowman that I will be using in another series.  

We love to do Mad-Libs in my house.  It is also a great way to help the kids learn and remember all the parts of speech.   

So here is MY "Mad-Libs" style creation:

You get these worksheets at my Etsy Store or TpT Store.


Saturday, December 19, 2015

Candy Cane Heart Candies


I have NEVER made candies before in my life. (This is one of two I made this year.) These were the easiest things I have ever made....and so cute and pretty, too!!

What you will need: 


small candy canes
white chocolate chips
milk chocolate chips
sprinkles
parchment paper and cookie sheet or something flat than can be moved to a cooler location
piping bag or small ziploc baggie


Step #1: Put the candy canes in a heart shape on the parchment paper. 


Step #2: Melt ONE of the chocolates in a microwave.  Do this in
 30 second increments.  


Step #3: Put the melted chocolate into the piping bag or ziploc baggie. 
(If using a ziploc baggie - put all of the chocolate in and maneuver it down to one corner.  Then make sure all the air is out of the bag.  Cut a tiny snippet off that corner.  If you want the piping to be larger- make a larger whole, smaller piping line - smaller hole.)

Step #4: Pipe the chocolate inside the "hearts" you made.  Put sprinkles on the top of the chocolate. 


Step #5: Melt the OTHER chocolate and repeat steps 2-4. 


Step #6: Put in a cooler place to set.  


Candy Cane Cookies


We had an extra white cake mix and some candy canes and I thought.....hmmmmm this could be tasty!  And they were! Great thing is that you always end up having left over candy canes.  You can bake these before or after Christmas.  I also think the green and red ones would be pretty, too! 

What you need:


white cake mix
1/3 cup of oil
2 eggs
1 cup of crushed (not dust) candy canes - split in half:
1/2 to sprinkle on top
1/2 to add in the batter
 (If you can't SEE the pieces in the batter, add a little more.) 
Parchment paper (a baker's BFF)
cookie sheets
can of spray oil (not shown)
ice cream scooper (not shown)


Step #1: Heat oven to 350 degrees F

Step #2: Line your cookie sheets with the parchment paper and set aside 


Step #3: In a large bowl put in- white cake mix, eggs, and oil.  Now using electric beaters, mix together.  It will get a bit difficult, just try to get all of it off the beaters. 


Step #4: Add in the crushed candy cane and mix together again with the electric beaters.  

Step #5: Spray the ice cream scooper.  Scoop out some dough and drop it on the parchment paper.   Sprinkle some of the crushed candy can on top.

Step #6: Bake in the oven for 4 minutes.  Turn the cookie sheet around and bake 3 minutes more.  You will know they are done when they feel "spongey" and slightly brown on the edges.


Step #7: Let Cool and enjoy!

Holly & Jolly Elf Worksheets


I decided it was time to start a  new series.  I have done Grinch-y series of worksheets, and Pete the Penguin.  Now I will be working on some sheets for Holly & Jolly Elf!   
You can find this fun plural sheet at either my TPT store.


Friday, December 18, 2015

Brownie -Cherry Thumbprint Cookies


Brownie-Cherry Thumbprint Cookies were to die for.  I originally wanted to do just Chocolate-Cherry Thumbprint cookies...and we did...watch for that post.  But I was thinking how much I love brownies...and putting cherries with them....it just HAD to be heaven!  And it was! 

What you will need:


brownie mix
1 can of cherry pie filling
2 eggs
6 tbsp. of oil
2 tbsp of water (not shown)
1/2  cup of flour (not shown)
parchment paper (not shown)
cookie sheets


Step #1: Heat oven to 350 degrees F

Step #2: Line your cookie sheets with the parchment paper and set aside


Step #3: In a large bowl add - brownie mix, oil, water, eggs, and flour.   Using an electric mixer, mix well.  It will get thick so get as much as you can off the beaters and continue with a spoon OR your hands, like my daughter did. 


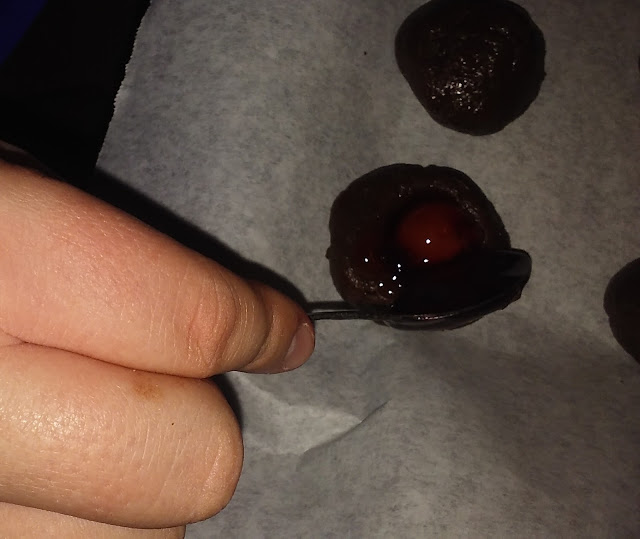
Step #4: Roll the dough into balls and put on the parchment paper. You can use your thumbs to make the imprint, but it just didn't look right to us, so we used one of our rounded measuring spoons.  It was PERFECT! 


Step #5: Add a cherry to each "imprint" with a little of the syrup.  If your imprint is bigger, you might get away with doing two cherries.  We tried two cherries and it didn't work..but the mistake was oh, so delish!


Step #6: Put in the oven for 4 minutes, then turn the cookie sheet around and bake for another 3 minutes.  Check with a toothpick.  If it comes out mostly clean, it is done.  DO NOT OVER COOK!.  


Step #7: Let cool and enjoy!


Christmas Spirit Cookies


These are what we call "Christmas Spirit Cookies" because of the colors...they seem to just say "Merry Christmas"!  

I found that using cake mixes make the cookies so much softer!  I am not a fan of crisp, crunchy cookies.   When I discovered, by accident, how using the cake mixes changed that....we did almost ALL our cookies this way...and with great results. 

What you will need:

white cake mix
1/3 cup of oil
can of oil spray (not shown)
2 eggs
Christmas sprinkles
M&M mini baking bits
parchment paper (a baker's best friend)
cookie sheets
a glass, or measuring cup or something that has a flat bottom (not shown in the picture above, but we used our 1/3 measuring cup, you will see that in another picture below.)

Step #1: Heat oven to 350 degrees F

Step #2: Line your cookie sheets with the parchment paper and set aside


Step #3: In a large bowl put in- white cake mix, eggs, and oil.  Now using electric beaters, mix together.  It will get a bit difficult, just try to get all of it off the beaters. 


Step #4: Add in some sprinkles and mix together again with the electric beaters.  


Step #5: Spray your hands with the oil spray and start to roll the dough into balls and put on the parchment paper.


Step #6: Using your glass/measuring cup,etc. press the balls down to about 1/2 thick, or so.  


Step #7: Put your M&M minis on top and gently push in. 


Step #8: Bake for 4 minutes and then turn the cookie sheet around.  Bake another 3 minutes.  They will be done with you touch them and they feel almost like a sponge.  Another sign will be a little brown at the edges. 


Step #9:  Cool and enjoy! 

** If you don't have sprinkles you can always use a Holiday Funfetti Cake mix...the sprinkles are already in it!!